优雅地在 Linux 下工作
服务器常用操作
-
pip 换源:
pip install -i <url> <package_name>https://pypi.tuna.tsinghua.edu.cn/simplehttp://mirrors.aliyun.com/pypi/simple/
-
Jupyter Notebook 的跨 ssh 连接
- 服务器:
jupyter notebook –no-browser –port=8890 - 本地:
ssh -N -f -L localhost:8888:localhost:8890 usr_name@server_ip
- 服务器:
-
nohup
-
tmux
深度学习相关
-
查看 cuda 版本:
cat /usr/local/cuda/version.txt -
指定显卡训练:
CUDA_VISIBLE_DEVICES=1,2 python ... -
- 查看 pytorch 版本:
print(torch.__version__)
- 查看 pytorch 版本:
-
指定 CUDA 编号:CUDA_VISIBLE_DEVICES=1
Anaconda
第一次安装 anaconda 时,可能需要激活环境变量:在 vim ~/.bashrc 里 export 一下。
| 需求 | 指令 |
|---|---|
| 查看当前所有环境 | conda info --env |
| 新建一个环境 | conda create --name experiment python=3.5 |
| 在某个目录下新建环境 | conda create --prefix ~/env/experiment python=3.5 |
| 激活环境 | conda activate<name> |
| 关闭环境 | deactivate <name> |
| 删除环境 | conda remove -n python35 --all |
| 复制一个配置 | conda create -n experiment_new --clone experiment_last |
| 导出环境(相同 OS) | conda list --explicit > requirements.txt |
| 根据列表创建环境 | conda create --name python-course --file requirements.txt |
| 导出环境(跨平台) | conda env export > environment.yml |
| 重建环境(跨平台) | conda env create -f environment.yml |
注:上述表格里的”导出环境“都是导出一个配置列表,重建时 Conda 会重新下载安装包。在实际应用中,如果新环境网络状况不稳定,可以考虑用 Conda Pack 来 打包整个环境。
Conda 操作可以参考这个教程。 首先我们用 conda install -c conda-forge conda-pack 或者 pip install conda-pack 安装 conda pack。也可以直接在官网上下载 whl 安装(体积特别小)。
打包一个环境的两种方法
conda pack -n my_env -o out_name.tar.gzconda pack -p /explicit/path/to/my_env
将 tar 包复制到新平台即可重建环境(操作系统要一致)
1 | mkdir -p my_env |
修改 channel:打开 ~/.condarc
1 | channels: |
Linux Command
cat/more/head/tail: print the file content on the screen.
1 | cat [file...] |
find: find files and directories and perform subsequent operations on them.
1 | find [path...] [-options] |
grep: Search the matched line from a source.
1 | grep [options] PATTERN [file...] |
ln: Create a hard link or a symbolic link (symlink) to an existing file or directory.
1 | ln [-fs] [-L|-P] source_file target_file |
ls:查看目录下的文件。
1 | ls [options] [file...] |
ps: Process Status, list the currently running processes and their PIDs.
1 | ps [options] [--help] |
Note: The TIME column counts the total accumulated CPU utilization time for a process, and 00:00:00 indicates no CPU time has been given by the kernel till now. For example, bash always shows 00:00:00, because it is just a parent process for different processes which needs bash for their execution.
tar/gzip/zip/rar: compress/decompress the files. -v == --verbose: show the process.
1 | tar xvf <name>.tar[.gz/bz2] |
vim
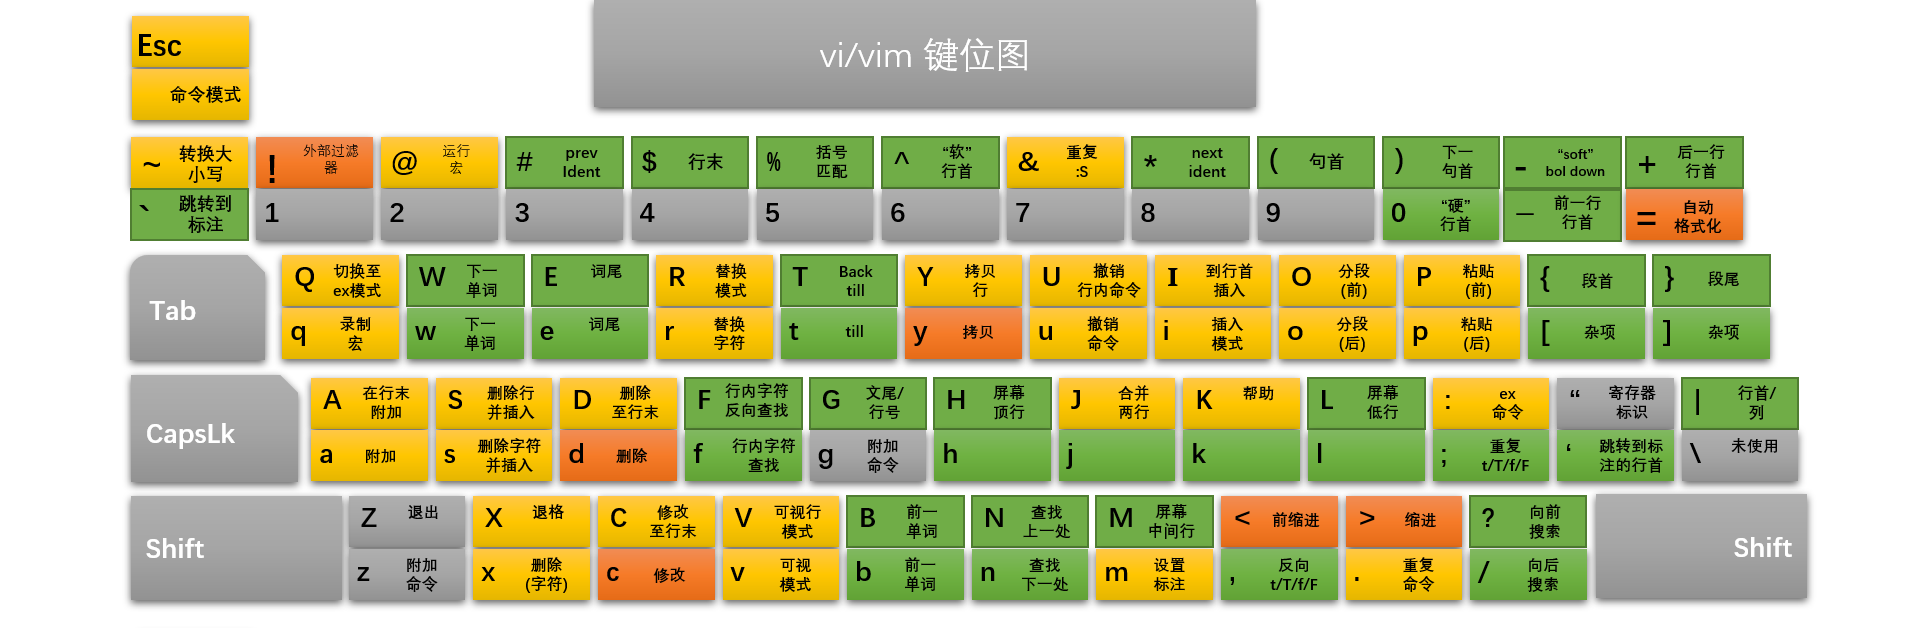
移动光标:可在前面加数字表示移动的次数。
| key | function |
|---|---|
| h/j/k/l | 光标向左/下/上/右移动一位 |
| w 或 W | 光标移动至下一个单词的单词首 |
| b 或 B | 光标移动至上一个单词的单词首 |
| e 或 E | 光标移动至下一个单词的单词尾 |
| 0 或 Home | 光标移动至当前行最前面的字符 |
| $ 或 End | 光标移动至当前行最后面的字符 |
| G | 光标移动至文件最后一行 |
| gg | 光标移动至文件第一行 |
| ctrl+f | 向下翻页 |
| ctrl+b | 向上翻页 |
查找和替换文本
| key | function |
|---|---|
| /abc | 从光标所在位置向前查找字符串 abc |
| /^abc$ | 查找以 abc 为行首/尾的行 |
| ?abc | 从光标所在为主向后查找字符串 abc |
| n | 向同一方向重复上次的查找指令 |
| N | 向相反方向重复上次的查找指定 |
| r | 替换光标所在位置的字符 |
| R | 从光标所在位置开始替换字符,其输入内容会覆盖掉后面等长的文本内容,按“Esc”结束 |
| :n1,n2s/a1/a2/g | 将文件中 n1 到 n2 行中所有 a1 都用 a2 替换 |
| :%s/a1/a2/gc | 尝试将文件中所有的 a1 都用 a2 替换,取代前会询问用户 |
插入删除操作
| key | function |
|---|---|
| x/X | 向后/前删除一个字符 |
| dd | 删除当前行 |
| yy | 复制当前行 |
| p/P | 粘贴到当前行的下/上一行 |
| u | 撤销上一个操作 |
| ctrl+r | 重做上一个操作 |
 wechat
 alipay